NightDriverStrip: ESP32 LED Effects Firmware Build Guide
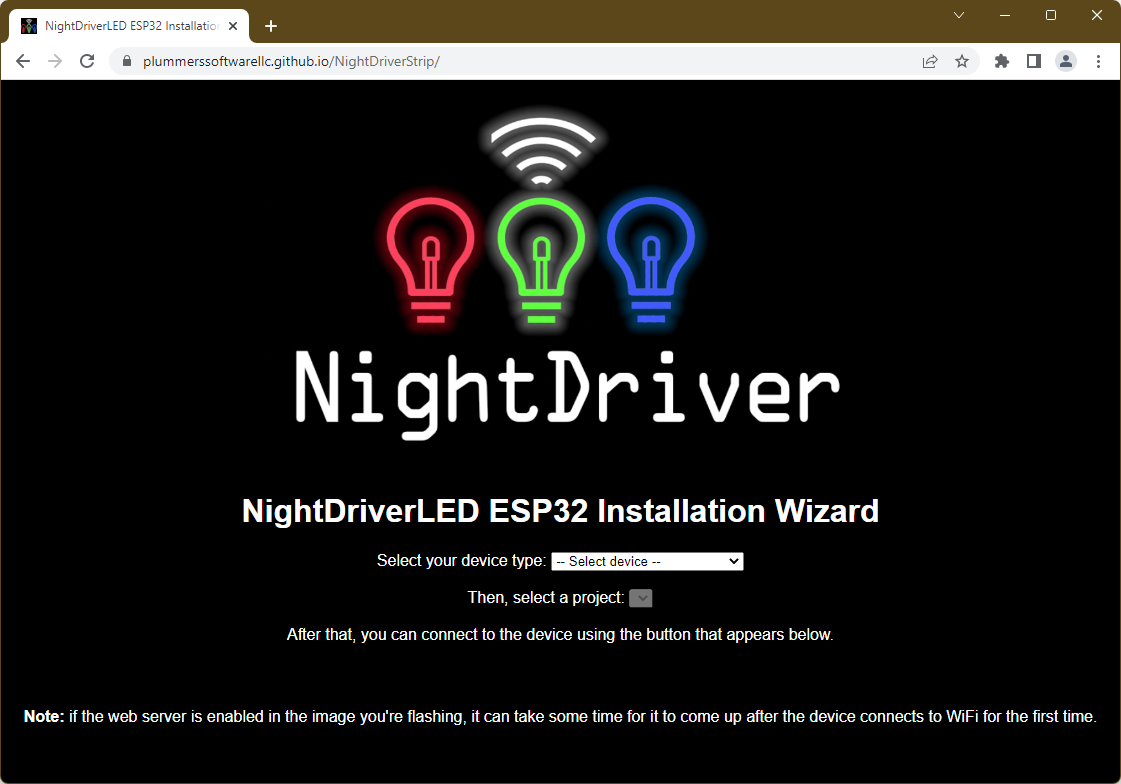
The NightDriverStrip web installer showing the device and project selection dropdowns before flashing.
- ESP32
- WS2812B LED strip
- HUB75 LED matrix
- M5StickC Plus
- M5STICKCPLUS
- M5STACKCORE2
- ATOMLIGHT
- LILYGOTDISPLAYS3
- OLED display
- TFT display
- LCD display
- Microphone module
What You Will Build
NightDriverStrip turns an ESP32 into a powerful LED controller capable of driving up to 8 channels of WS2812B-style strips or HUB75-style matrices simultaneously. Once flashed, your device hosts its own web interface so you can switch between dozens of built-in effects from a browser on any phone or computer on your network.
Effects range from simple colour washes to audio-reactive animations that pulse and beat-match to music in real time — provided your board has or is connected to a microphone. Multiple ESP32s can run in sync using NTP, making it possible to build large, coordinated LED installations. The firmware also accepts compressed LED colour data over TCP/IP on port 49152, which is how the companion NightDriver desktop client streams custom effects to the device.
What You Need
Hardware
- An ESP32 board. Boards explicitly supported by the web installer include the M5StickC Plus, M5STICKCPLUS, M5STACKCORE2, ATOMLIGHT, and LILYGOTDISPLAYS3, among others.
- One or more WS2812B (or compatible) LED strips, or a HUB75 LED matrix panel.
- A 5 V power supply capable of supplying enough current for your LED count. The ESP32 itself should not power the strip directly for anything but a handful of LEDs.
- A USB cable to connect the ESP32 to your computer for flashing.
- Optional: an OLED, TFT, or LCD display for on-device status, and a microphone module for audio-reactive effects.
Software (Web Installer path)
- A recent version of Chrome, Edge, or Opera — these are the browsers that support the Web Serial API required by the installer.
Software (Source code path)
- PlatformIO (the README recommends it as the build tool).
- A copy of the repository source code.
Typical use cases
Connect a microphone and let NightDriverStrip analyse beats and frequencies to drive light shows that respond to music in real time.
Flash several ESP32 boards with the same configuration and use NTP-based sync to run coordinated effects across multiple strips or panels simultaneously.
Mount a WS2812B strip behind a TV or desk and control colours and effects from any browser on your network using the built-in web UI.
Drive a HUB75 LED matrix panel with the same firmware to create animated displays for signs, clocks, or decorative panels.
How It Works
NightDriverStrip runs a main effect loop on the ESP32, cycling through whichever effects you have configured. Each effect drives the LED channels directly via the chip pins. When WiFi is enabled, the firmware:
- Connects to your network using credentials you supply in
include/secrets.h. - Syncs its clock with an NTP server so multiple devices can display perfectly timed, coordinated effects.
- Starts a web server that hosts the device UI and a REST-like API for live configuration.
- Opens a TCP socket on port 49152 to receive compressed LED colour data from a PC running the NightDriver client.
- Optionally starts a telnet debug server and exposes the same console over the USB serial port.
Audio-reactive effects use samples from a connected microphone to perform beat detection and frequency analysis, then drive the LEDs accordingly. Feature flags in globals.h or platformio.ini let you enable or disable WiFi, the web server, audio, OTA updates, and display support without changing core logic.
Flash with the Web Installer (Quickest Path)
If you want lights running in under five minutes without touching source code, the web installer is the place to start.
- Connect your ESP32 board to your computer with a USB cable.
- Open Chrome, Edge, or Opera and go to:
https://plummerssoftwarellc.github.io/NightDriverStrip - Select your device from the first drop-down (for example, "M5StickC Plus").
- Select the project you want from the second drop-down. Each label shows letters indicating which features — WiFi, web server, audio, etc. — are enabled in that build.
- Click CONNECT, choose the correct serial port from the dialog (usually labelled "USB Serial Port (COMn)"), and click Connect.
- In the next dialog, click INSTALL <project> FOR <device>.
- If this is your first flash of NightDriverStrip on the device, check the erase box to start clean, then click NEXT.
- Confirm by clicking INSTALL and wait roughly two minutes for the process to complete.
- After flashing, follow the on-screen prompts to enter your WiFi SSID and password.
- Once connected, you can visit the device's web UI by typing its IP address into a browser.
After the web server starts (allow up to a minute), the UI lets you switch effects and view live performance statistics.
Build from Source with PlatformIO
Use this path when you want to customise effects, change pin assignments, or enable features not included in the pre-built images.
1. Set up credentials
Copy include/secrets.example.h to include/secrets.h and set your WiFi SSID and password inside include/secrets.h. Do not edit secrets.example.h — it is committed to the repository.
2. Enable WiFi (optional but recommended)
In globals.h or platformio.ini, set:
#define ENABLE_WIFI 1
3. Build and upload the DEMO configuration
The README recommends starting by building the DEMO configuration with PlatformIO and uploading the resulting binary to the ESP32. Refer to the build pointers section of the repository for the exact build commands.
4. Wire the LED strip
Connect your WS2812B strip's data line to the pin defined as LED_PIN0 in include/globals.h. Per the README, example pin assignments are:
- ATOMLIGHT: Pin 5
- M5STICKC, M5STICKCPLUS, M5STACKCORE2: Pin 32
- LILYGOTDISPLAYS3: Pin 21
Also connect the strip's GND and 5 V rails to an adequate external power supply.
5. Access the web UI
Once the device boots and connects to WiFi, open a browser and enter the device's IP address. Use the icons on the left side of the UI to toggle views and change the active effect.
Extending the Project and Known Limits
Ideas to take it further
- Add your own effects: The README explicitly invites contributors to add effects. Review the existing effect classes in the source for the pattern to follow, then register your new effect in the configuration.
- Multi-device sync: Flash two or more ESP32s with the same configuration. Because each device syncs to NTP, effects that are time-based will run in lockstep across all of them — useful for room-scale or staircase installations.
- Stream from a PC: Run the NightDriver desktop client on a Windows machine to push custom, per-pixel colour data to the ESP32 over TCP. The device decodes LZ-compressed or uncompressed frames from port 49152.
- Add a display: Wire an OLED, TFT, or LCD panel and enable the display feature flag to get on-device effect names and performance stats without opening a browser.
- Audio reactivity: Connect a compatible microphone module and enable the audio feature flag for beat-reactive and frequency-spectrum effects.
Limitations to be aware of
- The web installer requires a browser with Web Serial support (Chrome, Edge, or Opera). Firefox and Safari are not supported.
- Customising effects or pin assignments requires editing C++ source and reflashing; there is no over-the-air code deployment for user-written effects.
- Large LED counts need a robust external 5 V supply. Insufficient current is the most common cause of flickering or brownouts.
- Build times can be long on first compile due to the number of dependencies pulled in by PlatformIO.
NightDriverStrip is a mature, actively maintained firmware project with an unusually low barrier to entry thanks to its browser-based web installer — you can have LED effects running on a supported board in a few minutes with no toolchain setup. Makers who want to go further will find a well-structured C++ codebase with clear extension points for custom effects, multi-device sync, and audio reactivity, though meaningful customisation does require PlatformIO and some C++ familiarity.
Sources
github.comPlummersSoftwareLLC/NightDriverStrip — repository & README plummerssoftwarellc.github.ioOfficial websiteFacts in this article come from the project's public README and GitHub metadata at the time of writing. Images belong to their respective owners and link back to the original source.