Tokpet: ESP32-S3 Desk Pet That Watches Your AI Token Usage
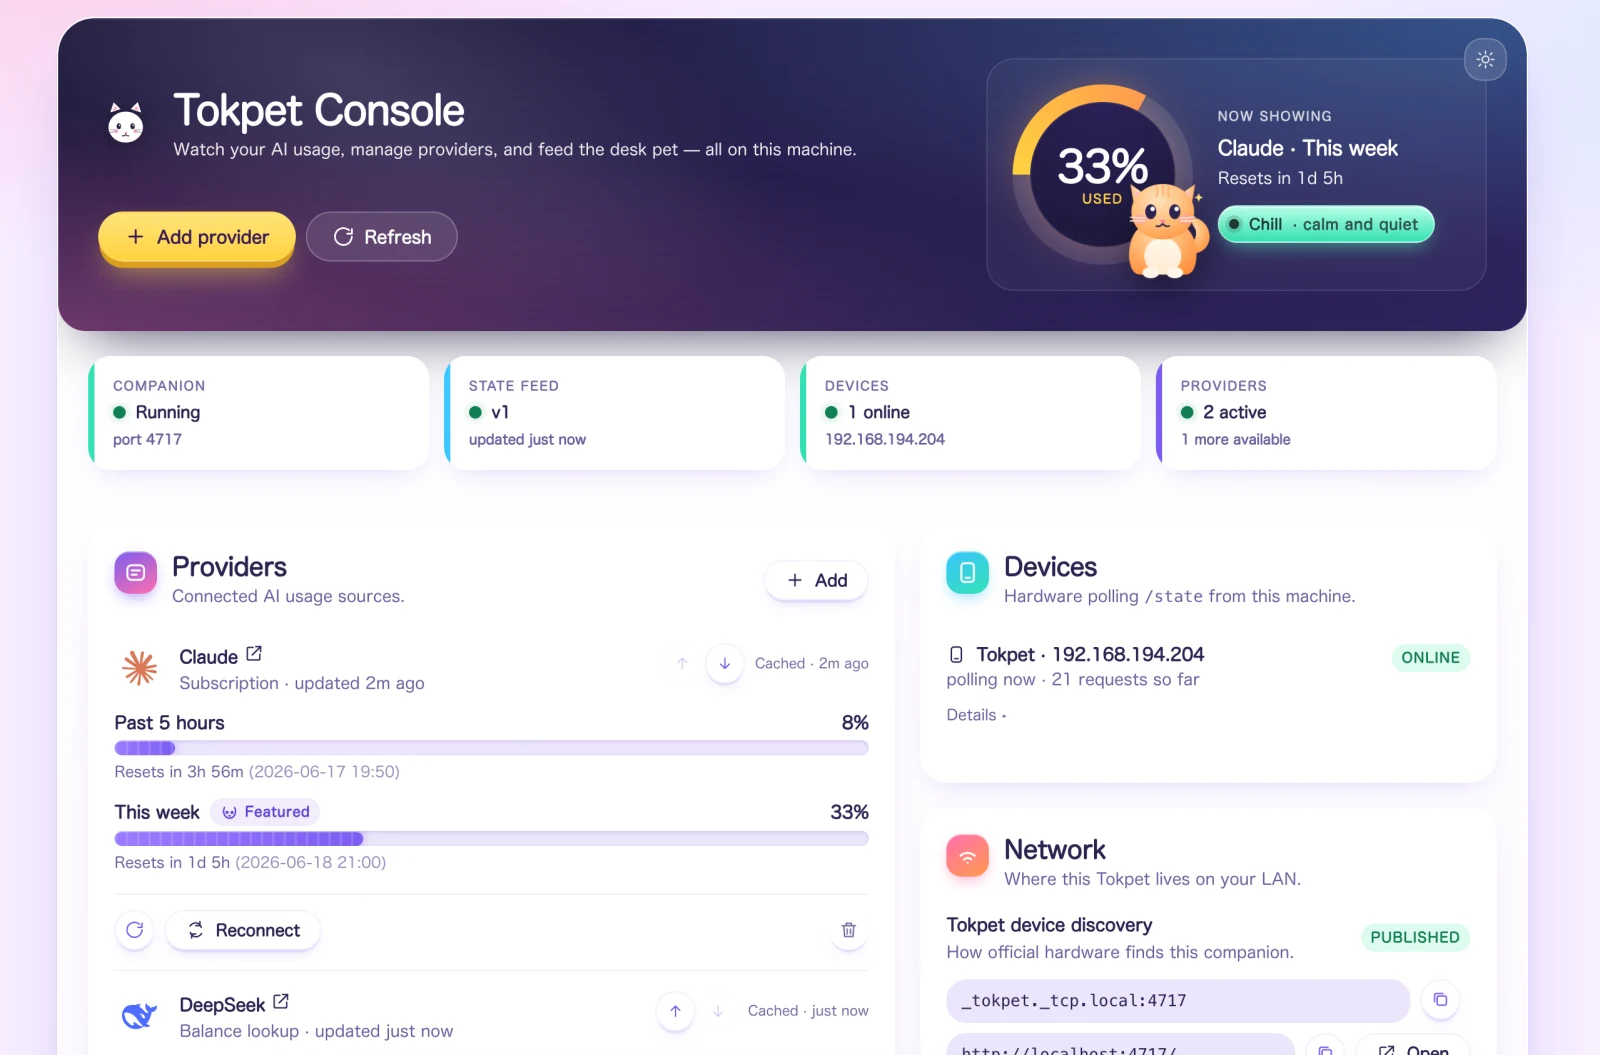
The Tokpet browser console showing live usage rings, the mood-driven cat, provider cards, and connected device discovery.
- M5Stack StopWatch board
- ESP32-S3 (dual-core, 8 MB PSRAM)
- CO5300 466×466 round AMOLED display
- CST820 capacitive touchscreen
What You Will Build
Tokpet turns abstract AI token quotas into something you can glance at across the desk. The project has two halves that work together.
The first half is a small Node.js companion service that runs on your laptop or desktop. It polls your connected AI providers — Claude, Codex, and DeepSeek today — normalizes their wildly different billing models (rolling-window quotas, prepaid balances, API-key spend) into one common shape, and serves the result as a single GET /state JSON feed on your local network. The setup and configuration routes are locked to loopback; only the read-only /state endpoint is visible to the rest of your LAN.
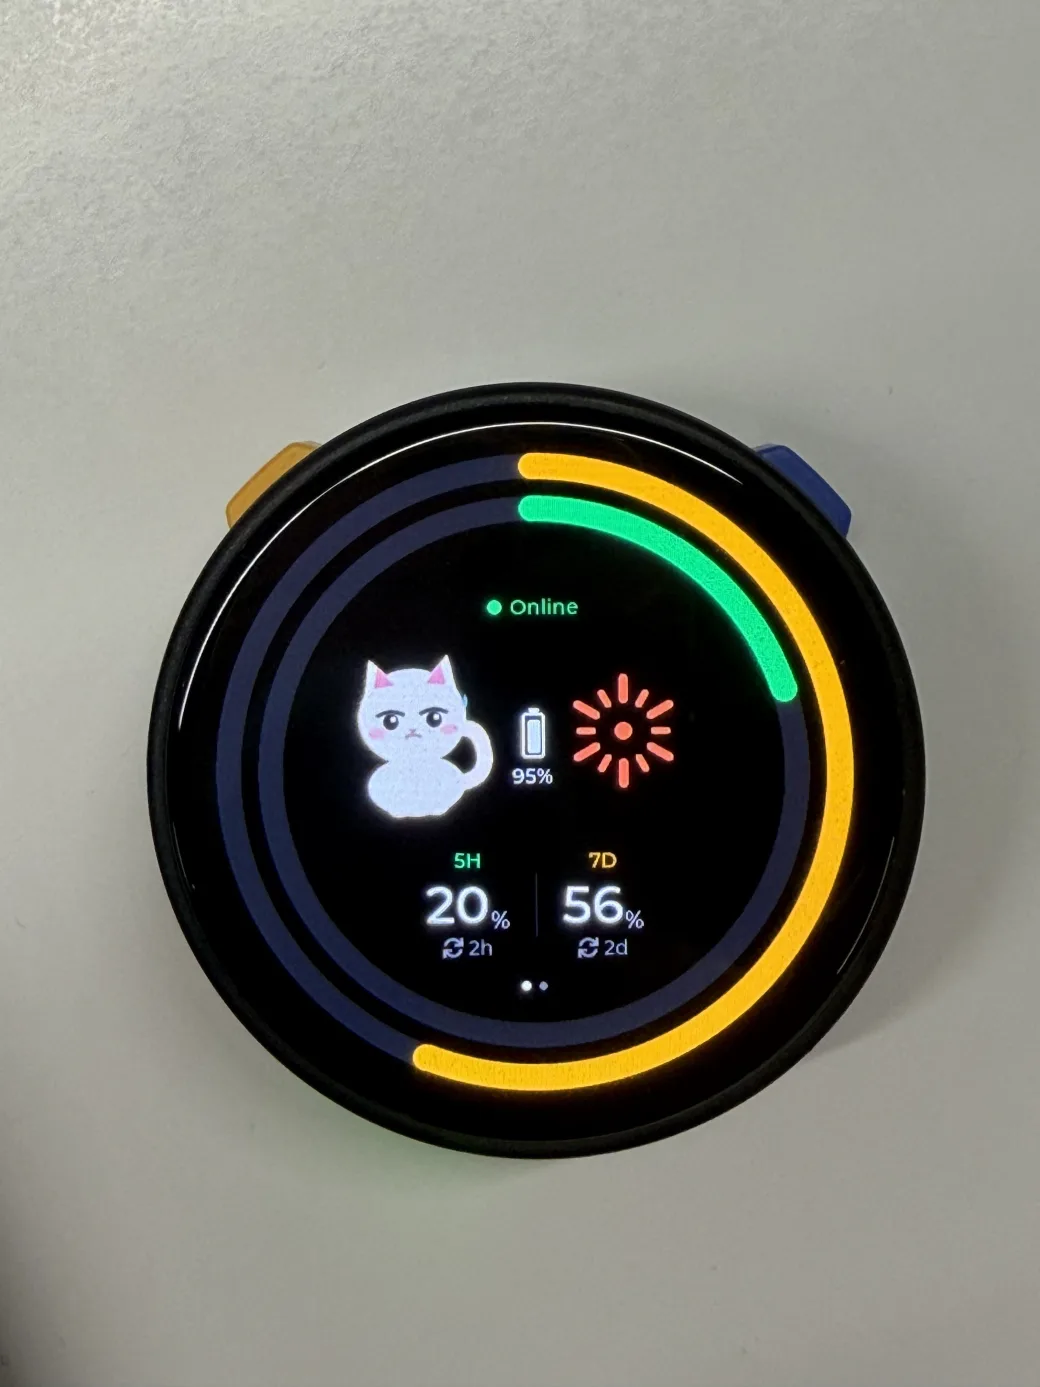
The second half is an ESP32-S3 desk pet built on the M5Stack StopWatch board, featuring a 466×466 round AMOLED screen. The firmware discovers the companion over mDNS, polls /state, and renders your usage as concentric glowing rings around a cat whose expression shifts from calm to panicked as you burn through your quota. Usage below 50 % is chill; 50–79 % is alert; 80 % and above is stress.
You do not need the hardware to get value from Tokpet — the browser console at http://localhost:4717 is a full client on its own. But the physical device is what makes it ambient and actually glanceable.
 \2
\2What You Need
Hardware (for the device)
- M5Stack StopWatch board — this provides the ESP32-S3 chip (dual-core, 8 MB PSRAM), the CO5300 466×466 round AMOLED display, and the CST820 capacitive touchscreen in one unit
- A USB cable for flashing
Software for the companion service
- Node.js 20 or newer (Homebrew installs this for you on macOS)
- Homebrew (macOS, recommended) or npm (cross-platform)
Software for the firmware
- ESP-IDF (the standard Espressif build and flash toolchain)
- The Tokpet repository, cloned from GitHub
AI provider credentials — at least one of:
- Your existing Claude Code login (no separate API key required)
- Your existing Codex CLI login (no separate API key required)
- A DeepSeek API key (for prepaid balance monitoring)
No soldering or wiring is required if you use the M5Stack StopWatch board — the display, touch, and ESP32-S3 are already integrated. Wi-Fi credentials are provisioned directly on the device through a captive-portal hotspot; you never need to hardcode a network password into the firmware.
Typical use cases
Keep a physical reminder of your AI quota on your desk without opening a browser tab. The cat's mood gives you an instant read at a glance.
Claude, Codex, and DeepSeek each expose usage in completely different ways. Tokpet collapses them into one versioned feed so you see everything in one place.
The /state endpoint is a stable, versioned JSON contract any device on your network can consume — build secondary displays, automations, or dashboards on top of it.
The companion is designed for contribution: each provider is a self-contained directory. It is a practical starting point for anyone who wants to learn how to normalize AI billing APIs.
How It Works
Understanding the data flow makes the build easier to troubleshoot.
The companion service polls each activated provider using that provider's native API. Every provider's data is mapped onto a common Usage shape, cached with a TTL, and aggregated into a single snapshot. The snapshot is served at GET /state as versioned JSON. The top-level primary field carries the hero metric — the provider and window that matter most right now — along with usedPct (0–100) and mood.
The companion also advertises itself over mDNS as _tokpet._tcp.local, so devices on the same LAN can find it without any manual IP configuration.
On the device side, the ESP32-S3 firmware boots and immediately creates a captive-portal Wi-Fi hotspot. You connect a phone or laptop to that hotspot and enter your network credentials through the portal — no USB serial interaction, no companion involvement. Once the device joins your network, it resolves _tokpet._tcp.local over mDNS and begins polling /state. The LVGL 9 halo-cat UI updates on each poll: the concentric rings reflect per-provider usage percentages, and the cat sprite changes expression based on the mood field in the response.
The /state schema is versioned ("version": 1) and is the only stability guarantee the project makes. Any hardware or client you build on top of it can rely on that contract remaining stable across minor releases.
Setting Up the Companion Service
Pick the install method that matches your system.
Homebrew (macOS — recommended)
brew install grpcer/tokpet/tokpet
brew services start tokpet
The service starts in the background and restarts automatically on login.
npm (cross-platform)
npm install -g tokpet
tokpet service install
tokpet service install registers a launchd background service on macOS. To run it in the foreground instead, just run tokpet.
From source (for hacking)
git clone https://github.com/grpcer/tokpet.git
cd tokpet
npm install
npm run dev
Once the companion is running, open the console:
tokpet open
or visit http://localhost:4717 directly in your browser.
To add a provider, click Add provider in the console, choose the usage mode (subscription or API key), select your provider, and click Test. If the test succeeds, the provider activates immediately and starts appearing in /state. Your configuration is saved to ~/.tokpet/config.json and restored on the next launch.
You can verify the feed is working at any time:
curl http://localhost:4717/state | jq
You should see a JSON object with version, fetchedAt, providers, and primary fields.
Flashing the ESP32-S3 Firmware
The firmware lives in the firmware/ directory of the repository and is a standard ESP-IDF project. If you cloned the repo during the source install above, it is already on your machine. If not, clone it now:
git clone https://github.com/grpcer/tokpet.git
cd tokpet
Connect the M5Stack StopWatch board via USB, navigate to the firmware directory, and flash:
idf.py flash
After flashing, the device reboots and displays a prompt to provision Wi-Fi. It creates a temporary hotspot — connect your phone or laptop to that hotspot and follow the captive portal to enter your home or office network credentials. The device then connects to your network, discovers the companion via mDNS (_tokpet._tcp.local), and starts displaying your usage.
If the device shows "open the console to add a provider", that message means the companion is reachable but has no providers configured yet. Go back to the browser console and add at least one provider.
If the device cannot find the companion after you move it to a new network, you will need to re-run the Wi-Fi provisioning flow. The project's TROUBLESHOOTING.md walks through the LAN, mDNS, and re-provisioning checks step by step.
Ideas to Extend It — and Current Limitations
Where to take it next
- Add a provider. The project is designed to make this small: copy a template into
src/providers/<mode>/<id>/, implementid,displayName,configSchema,isReady, andfetch, register it insrc/providers/registry.ts, and add a test. The full walkthrough is in CONTRIBUTING.md. Planned additions include OpenAI Plus, Cursor, Windsurf, direct API-key billing for Anthropic and Gemini, and relay gateways like OpenRouter. - Build a custom client. The
/statecontract is stable and provider-agnostic. Any device or script that can make an HTTP GET request can consume it — a secondary matrix display, a Home Assistant dashboard card, a terminal widget, or a Raspberry Pi panel. - Browser-only deployment. If you do not have the hardware, the web console at
http://localhost:4717provides the same rings-and-mood view in a browser tab. It is a complete client, not a stripped-down fallback.
Current limitations to be aware of
- Background service helpers (launchd) are macOS only today. Linux and Windows service support is on the roadmap.
- Subscription provider logins (Claude, Codex) require that you are already signed in with the respective CLI tool. Token-refresh flows are planned but not yet implemented, so if a login expires the provider will stop reporting until you re-authenticate.
- The reference hardware is specifically the M5Stack StopWatch board. Other round-screen ESP32-S3 boards would require changes to the firmware's board bring-up layer.
- The relay provider mode (for per-gateway custom billing) is planned but not yet available.
Tokpet is a well-scoped project with a clear separation between the companion service and the firmware, making it approachable even if you only want one half. The local-first design, mDNS auto-discovery, and on-device Wi-Fi provisioning mean the device genuinely requires no manual network configuration after flashing. The main constraint right now is macOS-only background service support and the limited provider list, both of which the roadmap addresses directly.
Sources
github.comgrpcer/tokpet — repository & README npmjs.comOfficial websiteFacts in this article come from the project's public README and GitHub metadata at the time of writing. Images belong to their respective owners and link back to the original source.